Category Archives: Devices

Pre-wedding photography

Pre-wedding photography, often referred to as engagement photography, is a popular trend in wedding preparations. It involves a professional photoshoot of the engaged couple before their wedding day. This photoshoot typically takes place a few months or weeks before the wedding and has several purposes:

When planning a pre-wedding photoshoot, consider the following:

  • Photographer: Hire a professional photographer who specializes in engagement or pre-wedding photography. Review their portfolio and discuss your vision for the shoot.
  • Location: Choose a location that is meaningful to you as a couple or one that complements the style you want for your photos. Common options include parks, beaches, urban settings, and even destination locations.
  • Outfits: Coordinate your outfits to create a cohesive look. Some couples opt for formal attire, while others choose more casual or themed outfits. It should reflect your personality and style.
  • Props and Themes: You can add personal touches to your photoshoot by incorporating props or choosing a specific theme, such as a vintage, romantic, or rustic theme.
  • Timing: Plan the photo shoot for a time of day with favorable lighting conditions, usually during the golden hour (early morning or late afternoon) for the best results.
  • Poses and Expressions: Discuss with your photographer the poses and expressions you’d like to capture. They can provide guidance and ideas to ensure you get a variety of shots.
  • Editing and Delivery: After the photo shoot, the photographer will edit and retouch the images before delivering the final photos to you. This process can take a few weeks, so plan accordingly.

Pre-wedding photography can be a fun and creative way to celebrate your engagement and build excitement for your upcoming wedding. It allows you to create beautiful memories that you can cherish for years to come.

what to do with pre-wedding photos

Pre-wedding photos, also known as engagement photos, can be a wonderful addition to your wedding preparations and celebrations. Here are some ideas for what you can do with your pre-wedding photos:
  • Save the Date Cards
  • Wedding Invitations
  • Guest Book
  • Wedding Website
  • Decorations
  • Photo Album
  • Social Media Announcements
  • Thank-You Cards
  • Gifts for Parents and Bridal Party
  • Personal Keepsakes
  • Slide Show or Video

What is the concept of a pre-wedding shoot?

  • Memories and Keepsakes
  • Announcement
  • Practice
  • Personalization
  • Venue Scouting
  • Wardrobe and Makeup Trials
  • Bonding
  • First-Anniversary Celebration

Memories and keepsakes announcement practice personalization venue scouting wardrobe and makeup trials bonding first-anniversary celebration what is pre-wedding and post wedding  photoshoot a pre-wedding and post wedding photoshoot are distinct types of photography session, each with its purpose and timing for a wedding

what is pre-wedding and post-wedding photoshoot

A pre-wedding photoshoot and a post-wedding photoshoot are two distinct types of photography sessions, each with its purpose and timing for a wedding.

Pre-Wedding Photoshoot

Pre-Wedding Photoshoot

  • Purpose: A pre-wedding photoshoot, also known as an engagement photoshoot takes place before the wedding. Its primary purpose is to capture the love, chemistry, and excitement between the engaged couple during the period leading up to their wedding.
  • Timing: Pre-wedding photos are taken several months or weeks before the wedding day.
  • Location and Style: Couples can choose various locations and styles for their pre-wedding photos, such as natural outdoor settings, themed shoots, or studio sessions. The choice often reflects the couple’s personalities and preferences.
  • Outfits: Couples typically have the freedom to wear different outfits, sometimes coordinating them to create a cohesive look. This allows for a variety of images with different styles and moods.
  • Usage: Pre-wedding photos can be used in various ways, including save-the-date cards, wedding invitations, guest books, and as part of the wedding decor. They are also personal mementos that the couple can cherish.

Post-Wedding Photoshoot

post-Wedding Photoshoot

  • Purpose: A post-wedding photoshoot, also known as a “trash the dress” or “day-after” photoshoot, takes place after the wedding. Its purpose is to capture unique and creative images of the couple in their wedding attire, often in a relaxed and non-traditional setting.
  • Timing: Post-wedding photos can be taken anytime after the wedding, ranging from the day after to several weeks or even months later.
  • Location and Style: These photoshoots often feature unconventional or adventurous settings, such as beaches, forests, abandoned buildings, or other locations that contrast with the formality of the wedding day. The style is usually more relaxed, and couples may be open to more daring or playful poses.
  • Outfits: Couples typically wear their wedding attire, including the wedding gown and suit. Since these photos are taken after the wedding, there is often less concern about keeping the dress pristine.
  • Usage: Post-wedding photos are less commonly used for formal announcements or invitations, but they are popular for creating artistic and unconventional images that showcase the couple’s personality and sense of adventure.

why do I choose a pre-wedding shoot?

Choosing to have a pre-wedding shoot is a personal decision, and there are various reasons why you might opt for this type of photography session. Here are some factors to consider when deciding whether to have a pre-wedding shoot and why you might choose one:
  • Capture Precious Moments: A pre-wedding shoot allows you to capture the love, excitement, and chemistry between you and your partner during the engagement period. These photos serve as cherished memories of this special time in your relationship.
  • Announce Your Engagement: Pre-wedding photos can be used to announce your engagement to family and friends. They provide a visual way to share your happy news and build anticipation for your upcoming wedding.
  • Personalization: Pre-wedding photos can add a personal and sentimental touch to your wedding preparations. You can use them in save-the-date cards, wedding invitations, guest books, or even as part of your wedding decor to make your celebration unique and meaningful.
  • Practice and Comfort: For many couples, a pre-wedding shoot offers an opportunity to get comfortable in front of the camera and with the photographer. This experience can help you feel more at ease and confident on your actual wedding day.
  • Wardrobe and Makeup Trials: You can use the pre-wedding shoot to try out different outfits and makeup looks. This helps you make informed decisions about your final wedding day attire and appearance.
  • Venue Scouting: If you’re considering multiple venues for your wedding, a pre-wedding shoot can be a practical way to visit and capture images at each location. This can aid in your decision-making process.
  • Bonding Experience: The photoshoot itself can be a fun and bonding experience for you and your partner. It allows you to spend quality time together, express your love, and create lasting memories in a visually artistic way.
  • High-Quality Photography: By hiring a professional photographer for your pre-wedding shoot, you ensure that you have high-quality images that you can cherish for years to come.
  • Gifts and Displays: Pre-wedding photos can be used as gifts for parents, bridal parties, or other loved ones. You can also display them in your home or at the wedding venue, adding a personal touch to your decor.

the best month for a pre-wedding photoshoot can vary depending on the location the desired backdrop or setting, and your personal preferences here are some considerations to help you choose the

Which month is best for pre wedding photoshoot?

The best month for a pre-wedding photoshoot can vary depending on your location, the desired backdrop or setting, and your personal preferences. Here are some considerations to help you choose the best month for your pre-wedding photoshoot:
  1. Seasonal Preferences: Consider which season you prefer for your photoshoot. Each season offers unique opportunities and challenges:Seasonal Preferences
    • Spring: Spring is known for blooming flowers and lush greenery. It can create a vibrant and colorful backdrop for your photos. Late spring (April to June) is often ideal when flowers are in full bloom.
    • Summer: Summer provides long daylight hours and opportunities for outdoor shoots. However, it can be hot and humid in some regions, so be prepared for the weather.
    • Autumn/Fall: Fall offers beautiful foliage with vibrant red, orange, and yellow leaves. This season is great for a cozy and rustic feel. September to November is usually the peak of fall colors.
    • Winter: If you love the idea of a winter wonderland, consider a winter pre-wedding shoot. Snow-covered landscapes can be stunning, but it’s essential to dress warmly.
  2. Weather Considerations: Check the typical weather conditions in your area during the months you’re considering. Ensure the weather aligns with your preferences and any specific themes or outfits you have in mind.
  3. Wedding Date: If your pre-wedding photoshoot is part of your wedding preparations and you plan to use the photos for invitations or save-the-date cards, choose a time that aligns with your wedding date. Many couples schedule their pre-wedding shoot several months before the wedding.
  4. Location: Consider the location or backdrop you want for your photos. Different locations may look best during specific seasons. For example, beach or waterfront shoots are often popular in the summer, while forest or mountain settings can be beautiful in the fall.
  5. Photographer Availability: Consult with your chosen photographer to find out their availability during the months you’re considering. Photographers may have busy seasons, so booking in advance is essential.
  6. Daylight Hours: The number of daylight hours can vary throughout the year. Choose a month when there are available daylight hours to ensure you have enough time for the photoshoot.
  7. Permit Requirements: If you plan to shoot in a public park or a location that requires permits, be aware of any seasonal restrictions or permit availability.
  8. Wardrobe: Consider the clothing and outfits you’ll be wearing for the shoot. Ensure that your chosen month aligns with the attire you have in mind.
  9. Personal Comfort: Think about your comfort in different weather conditions. If you’re sensitive to extreme heat or cold, choose a season that suits your comfort level.

conclusion:

While it’s important to communicate your vision, be open to your photographer’s creative input and suggestions. They have the expertise to make your photoshoot shine. A thorough pre-wedding photography consultation ensures that both you and your photographer are aligned in terms of expectations and creative direction. It sets the stage for a smooth and enjoyable photoshoot experience that results in beautiful, memorable images.

FAQ

1. What is pre-wedding photography?

  • Pre-wedding photography, also known as engagement photography, is a photoshoot that takes place before the wedding day. It captures the love, chemistry, and excitement between the engaged couple and often serves as a creative and personal way to document their journey leading up to the wedding.

2. Why should we consider pre-wedding photography?

  • Pre-wedding photos provide cherished memories of your engagement period, can be used for announcements and invitations, offer an opportunity to get comfortable in front of the camera, and can be incorporated into various wedding-related items.

3. When should we schedule our pre-wedding photoshoot?

  • The timing can vary, but most couples schedule their pre-wedding shoot several months or weeks before the wedding. This allows time for editing and using the photos for announcements or invitations.

4. How do we choose the right pre-wedding photographer?

  • Look for experienced photographers whose style aligns with your vision. Ask for recommendations, review portfolios, read reviews, and schedule consultations to ensure a good fit.

5. What should we wear for the pre-wedding photoshoot?

  • Your outfit choices should reflect your personality and the theme of the photoshoot. Many couples have multiple outfits for variety. Coordinate your attire and consider professional styling and makeup if desired.


5 Reasons Should Hire a Professional Photographer

Whether you’re reserving a family portrayal session or looking to modernize your headshots, choosing a professional shooter is a critical task. Not only do you need to find someone with the necessary chops to frame and take great prints, but they also need to have the post-production chops to edit your images subsequently.

As technology advances, further and further people have high-quality camera phones and indeed professional cameras of their own, but it still takes training and skill to produce quality prints. 5 Reasons Should Hire a Professional Photographer, but it’s well worth it to get the images you want from your photo session.

A professional photographer has top-notch equipment

Photographers who work professionally do so because they’re passionate about the medium. Their professional cameras will make sure that everything is beautifully recorded (longer lenses, better sensors), and their professional lighting equipment will make sure that there are no shadows or dark areas in your images. To ensure that your images also look professional, professional photographers utilize professional editing software. They can help you get relief from red eyes or smooth out your skin. You’ll have more time to enjoy the memories of the day because you won’t have to spend hours manually editing each shot. A professional photographer knows how to get all of the important moments.

At Aarav Creation Seattle wedding photographer, we’ve invested money in purchasing the wedding photographer equipment to run their business and meet their client’s needs, as well as invested time in learning how to operate and look after that equipment correctly. The wedding photographer in Seattle, Loc, and/or his team members will bring backup equipment on every shoot to avoid technical difficulties.

No one wants to miss out on precious memories because they are stuck taking photos with a timer or trying not to get caught when someone else uses their phone to take a photo. professional photographers know how to work fast and efficiently to make sure that no moment is missed. They also understand how to use the greatest lighting and angles for your photos, resulting in stunning pictures that you’ll treasure always.

A professional photographer has top-notch equipment

Professional Equipment: 5 Reasons Should Hire a Professional Photographer. Professional photographers invest in top-notch cameras, lenses, lighting equipment, and editing software. This advanced gear allows them to produce sharp, detailed, and visually stunning photographs that may not be achievable with consumer-grade equipment.

You will get higher-quality images

You will get higher-quality images

Naturally, better gear results in better images, but only if your photographer is skilled at using that gear. Your images will not only be of a great resolution, but a professional photographer will be able to capture the ideal shot thanks to their knowledge of framing, lighting, and technique. You can quickly and easily tell the difference between a photo shot by normal phone clicks and one shot by a professional—it’s clear from a glance that a pro knows exactly what they’re doing.

The editing will be stunning

Part of the investment in professional photography services includes the time and skill your photographer puts into editing your images. The best photographers don’t just know about lighting and setting up an image—they also know how to edit a dark or so-so photo into something gorgeous and impressive. The amount of time to edit photos is the same or greater than the amount of time taking the photo sessions. Professional photographers have editing tools that go beyond what you can accomplish on your phone or computer, as well as the know-how to make your pictures come to life.

Expertise and Skill: 5 Reasons Should Hire a Professional Photographer. Professional photographers have a deep understanding of photography techniques, equipment, and composition. They know how to use lighting, angles, and settings to capture the best possible images. Their experience allows them to handle various situations and challenges, ensuring high-quality results.

The editing will be stunning

Bring your vision to life

A professional can work to produce pictures that closely resemble the idea you have for them. You have probably glanced through Pinterest or Instagram and seen some beautiful shots. They can walk you through posing, smiling and even positioning your body to help you feel more natural and comfortable and ensure that you get images that you’ll love.

Bring your vision to life

At Aarav creation, we have suggested 10 posing for couples and letting them interact with each other so couples will have great emotions in their beautiful photos. Seattle wedding photographer professional will help you realize the vision you have for your wedding photos. They can work with you to plan out every photo session, they can offer suggestions for photo locations that fit your personality, and They can help in creating a unique wedding album that will best display your great images. The only option for wedding photography is to hire a professional.

Bring your vision to life

Creative Vision: 5 Reasons Should Hire a Professional Photographer. Professionals bring a creative and artistic touch to their work. They have a unique vision and can turn everyday scenes into extraordinary images. Whether it’s a wedding, a corporate event, or a product shoot, they can add an artistic flair to your visuals.

A professional has a trained eye

Professional photographers just have a creative eye that enables them to take unique and lovely pictures, in addition to all of the reasons mentioned above. They can find the ideal light and angles to make your images seem fantastic, and they know how to pose couples and families in a way that is natural and elegant. When you choose a professional photographer, you’re not just getting someone who has better equipment—you’re getting someone who knows how to use their equipment to create stunning images that will last a lifetime. The pictures below are taken at the same spot.

Time and Stress Savings: Hiring a professional photographer saves you time and relieves you of the stress associated with taking photos yourself. They handle all aspects of the photography process, from planning and shooting to post-processing and delivery. This allows you to focus on other important tasks or simply enjoy the moment.

A professional has a trained eye

The final benefit of hiring a professional is that you may relax while your Seattle wedding photographer does all of the hard work. They know how to take photos in any lighting situation, they know how to frame up shots perfectly based on their client’s description, they know how to set up professional lighting equipment quickly (if applicable), and most importantly, they know how to make sure everyone looks their best in every picture. They also know how to quickly set up professional lighting equipment, if applicable.

Professional photographers will not only deliver high-quality images, but they will also provide better wedding photos than you could have envisioned yourself, thanks to their increased creative input within the workflow process.

Consistency and Reliability

When you hire a professional photographer, you can expect consistent and reliable results. They are skilled at maintaining a high standard of quality across all their work. You can trust them to capture important moments or showcase your products consistently.

why consistency:

Your brand’s professional and polished appearance anticipates a certain level of quality and attention to detail that customers expect when they browse your items. Ensuring consistent product photography showcases your brand professionally and cohesively, making a lasting impression on customers.

Inconsistent product photography, including variations in lighting, backdrop, or product placement, can negatively impact your brand and customer perception. Such inconsistencies may give your business an amateurish and disorderly image, potentially confusing and frustrating customers who want to compare items.

Consistency fosters trust and reliability among your customers. When customers observe high-quality and consistent product images, they are more inclined to trust your brand and view it as dependable. This can result in increased customer loyalty and positive word-of-mouth marketing, ultimately driving sales and fostering business growth.

Happy planning!

It doesn’t have to end here. Visit our portfolio to see more of this Seattle wedding photographer’s work. If you’re looking for professional wedding photography services in the Seattle area, be sure to contact Aarav Creation. With over 8 years of experience, we know how to capture your wedding day perfectly!? You can contact us through our contact form. I can’t wait to hear from you!

conclusion

Professional photographers bring expertise, equipment, creativity, reliability, and convenience to your photography needs, making them a valuable investment for various occasions and projects.

Lifestyle product photography

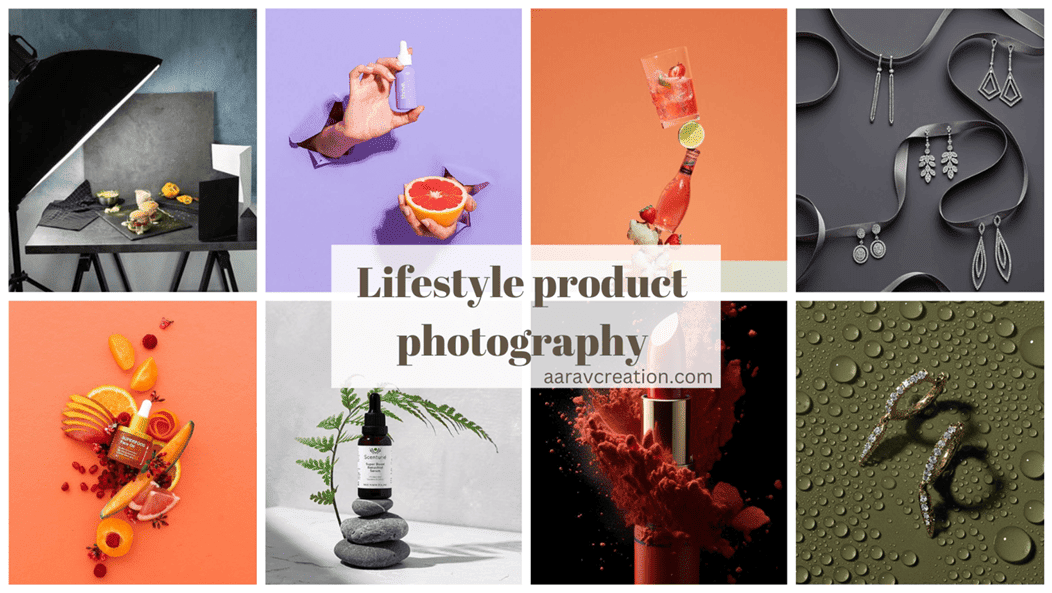
Lifestyle product photography is a type of photography that shows products in real-life scenarios. The goal is to create a more realistic and interactive image than traditional advertising. Lifestyle product photography can help customers see how a product will look and determine its proportions. It can also help eCommerce business owners keep more clarity on what they are selling.

A type of product photography known as lifestyle product photography aims to showcase your product in a designed setting, with or without models, to highlight its primary function and the variety of ways a potential buyer might use it.

It is different from the conventional strategy because of how relatable and interactive it is. A thing looks more convincing when you see it in its natural setting rather than against a stark white background.

Here are some tips for shooting lifestyle product photography

  • Use props
  • Proper lighting setup
  • Choose the right backdrop
  • Tell your story
  • Choose a color scheme
  • Show a sense of scale
  • You can also try these ideas:
  • Bird’s eye view
  • Incorporate body parts
  • Shoot from unusual angles
  • Show the ingredients
  • Focus on the product
  • Shoot with model
  • Incorporate negative space
  • Photo Retouching Services
  • Lifestyle Product Photography Tips That Can Boost Your Online Sales
  • Lifestyle Product Photography: Guide & Creative Ideas

Photography Lifestyle Products: 22 Ideas
Want to start creating lifestyle product photographs like a pro? Discover some new ideas for lifestyle photography that will help you explain the story of your goods.

1. Bird’s Eye View

flat lay lifestyle product photography
The most popular style of tabletop photography, known as flatley, is taken from above. It develops a narrative about the product, which helps in its representation. Carefully selecting the objects allows us to tell the story.

Bird’s Eye ViewThe image needs to be vibrant and dynamic, with elements that are typically used with the object you are photographing. To produce a coherent image with a visual impact, you should also pay attention to the color scheme.

2. Hire a Model

Using models to display your products will draw in more customers. People have an excellent understanding of how to use the product, how it may be applied to their lives, and all of its benefits. The model can also think of inventive positions to display the product in the best possible light.

Hire a ModelThe cost of hiring models, even necessary for clothes photography, can be high. luckily there are several resources available for finding free models for photography, including social networking sites.

3. Incorporate Body Parts

Analogous to the last suggestion, models are also included in these product images, but they do not enthrall the entire frame. The only visible corridor of them in the product image is their hands and legs.

Incorporate Body PartsThis is constantly seen in announcements for luxurious handbags when all you can see is the model’s hand carrying the bag. The conception can also be applied to shoe product photography. This can give the picture a mysterious finishing touch, especially if the photos were correctly modified. You have the option of handling print processing yourself or using an estimable picture editing service.

4. Shoot from Unusual Angles

Innovative angles in life goods photography
The standard system is to place the camera similar that the finished image looks as though we’re looking at the product in real life. To stand out from the competition, I advise you to try to probe unusual perspectives that the mortal eye can infrequently see.

Shoot from Unusual Angles

For illustration, you can try shooting from underneath the product. still, when shooting from unusual angles, Always be apprehensive of the possibility of distorting your product.

5. Show the Ingredients

The stylish idea for cosmetics and food photography is to incorporate the main constituents of the product. With food images, you can also incorporate the essential tools demanded to cook it.

Show the IngredientsThis adds the demanded texture to draw the implicit client in. Placing the constituents around the product can also be used to emphasize its organic nature.

6. Focus on the Product

Focus on the ProductSome product shots are so cluttered, that it’s unclear what’s the product being announced. When there are too numerous props, there are too numerous objects contending for the guests ’ attention. life product photography focus Make the product the focal point in the photography you capture to avoid any confusion. You’ll need to use a large orifice, like f/1.4, or f/1.2.

7. Use Props

Some shutterbugs perceive it as being fully dispensable to use fresh props. Though you have to concentrate solely on the product, directly chosen props will help convey the story and appealingly represent the item. For illustration, the baby examiner announced that the print over is harmoniously rounded with the kiddies ’ toys. Some product films are so cluttered that it’s unclear what the product is life product photography focus makes the product the focal( point in the photography you capture to avoid any confusion you’ll need to use A large orifice-like

Use Props

As food photography props you can use a refuse plank, chopstick, or cutting boards, as jewelry photography props you can use an acrylic holder set, flowers, fabric, or fruits. Take care to prepare different types of product photography props beforehand

8. Incorporate Negative Space

Lifestyle product photography negative space
When you frame the shots while shooting, flashback to take several broad prints with space. This is an important tip for prints that will, later on, be used on main websites. Negative space photography allows you to add a totem, advertisements, or a brand name to the shot later on, as well as to realize creative product photography ideas. Filling the entire frame with the product won’t leave any space for textbooks, and the brand will have to cover part of the product to type something.

9. Textured Background

lifestyle product photography background texture analogous to incorporating the ingredients of the product in the frame, this idea requires covering the background with only one main element. Such a textured background will incontinently catch an eye. It looks especially charming if the color of the background matches the packaging.

10. various Background

Lifestyle product photography colored background Every product shooter, who works in a plant, knows that the stylish background for Amazon product photography is purely white. But if you deal with life product photography, you’d choose more creative product photography backgrounds. A multicolored background can be a great way of boosting the visual appeal of the product. You can also try different creative color combinations.

11. Show Scale

Life product photography scale Although the textbook description of a product can mention dimension details, the picture you take is
supposed to demonstrate the product’s size. For case, imagine where a buyer will put this product, what other particulars will be near, and capture it together with these particulars. This life product photography trick will come in handy for particulars that have multiple sizes. It helps buyers make sure that they’re ordering an item of the right size, so they’re less likely to make a return.

12. Use Natural Lighting

Natural lighting contributes to a more genuine and dependable look of the product in the shot. However, it’s better to capture products with reflective or see-through shells, similar to sunglasses, If you decide to shoot in natural lighting. Stay down from full direct sun since it may throw dark murk on products. To keep the murk subdued without ruining the light’s intensity, use a commodity to diffuse the light. This may be a thin distance of white towel paper, day curtains, or a glass board.

13. Capture Drinks in spectacles

For regular product photography, you’d capture a drink in a bottle, but for life photography, I recommend capturing drink photography in spectacles. still, you can not just use simple plain spectacles, you should use a glass that respects your drink, and that is the applicable glass for it. A trick I’d like to share with you is to use fake ice cells. occasionally, you may spend a considerable quantum of time taking the shot, and fake ice cells will help you avoid spoiling the shot by melting.

14. Digital Context

Life environment can also be achieved digitally but requires some serious editing chops. Use software similar to Page 1 of 2 as Photoshop or Illustrator to cleverly manipulate your product prints from different perspectives. There are plenitude of Photoshop tutorials on YouTube for learning how to achieve this. Or you could get the stylish moxie by hiring a product retouching service expert.

15. Use Color Psychology

When taking product life photography, don’t forget about the rules of color psychology and reciprocal color photography. This way, the guests will be more inclined to buy the product. Take a look at the product shots of electronics( desktops, phones, tablets). These are frequently captured with a polished black background as black color is a symbol of fineness and trust ability. The general recommendation is to use colors from the totem as primary colors across the background or shot. The most prominent and recognizable illustration thing is Coca-Cola. Red and white colors prevail in all of their marketing juggernauts.

16. Understand Your followership

Speaking of product photography with models, first of all, you should identify the brand’s target followership. Find out the age group, gender, life, occupation, interests, education, preferences, and everything that can tell you about a person who would buy a particular product. still, point models of analogous age in your product photography, If the product is aimed at a youngish followership. As a result, implicit guests will be able to spot themselves in shots. After seeing models using the product, they will be more interested in retaining it as well.

17. Collage

One of the most recent trends in product images is creating print collages. With a collage, you can create a visual representation of the brand, and present the products in a particular environment. life product photography collage Another advantage of product collages is that you can use them to display products from several angles, or in several scripts in just a single image. You can moreover use free print collage makers or learn how to make a collage in Photoshop.

18. Create a Story

Lifestyle product photography narrative I advise you to figure out the lively operation of the product to attract the observers fluently. Let’s say you’re shooting a sports water bottle, for case, clicking its print while it’s kept on a tabletop may look veritably boring. On the other hand, you can choose your position to be a sand, where a fit model is drinking out of it after a morning run. This incontinently brings life to your product and makes it more applicable. People can relate fluently and are likely to be encouraged to buy that sports water bottle to look like her.

19. Keep It Authentic

A common mistake is to create life images that look fake. I recommend you go for authentic passions and feelings for your models. However, they might be sweaty, with messy hair, If your models pose in a spa. life product photography is authentic Steer clear of anything that looks unnatural, like an over-the-top smile on a model wearing makeup and lifting dumbbells. Use sincere and relaxed acts to try to immerse implicit guests in that atmosphere.

20. Evoke feelings

A significant element of life product photography is the mortal feelings it evokes. Since people tend to make choices based on their emotional responses, you need to impact the part of the brain responsible for feelings whenever you’re taking life product shots. life product photography feelings are supposed to be about the emotion you wish to communicate. To achieve that affective power in product photography, pick proper lighting, and place the product, and props consequently.

21. Use Shadows

Shadow photography makes an image pop by adding an intriguing element to the background. You can either learn how to add a drop shadow in Photoshop or manipulate the lighting to add the shadow of leaves, or hands.

22. Add Dynamics

Consider capturing presto-moving particulars while freezing the action. High-speed photography conveys feelings, time, speed, taste, etc., attracting the buyers ’attention. However, they will skip it and move on, If they come across a regular shot of lurkers. But if there’s a running athlete wearing lurkers in the shot, they’re more likely to lay their eyes on the product for further than just several seconds.

Lifestyle Product Photography Guide Benefits, Tips & How To Shoot Perfect Life Product Photography Life Product Photography dynamics To implement this idea, configure applicable camera settings for product photography. To freeze the action, pick a fast shutter speed, like 1/400. For the blur effect, try a slow shutter speed, like1/30 or lower. Life Product Photography Recommendations Then everything you need to know how to take product prints that will attract the guests ’attention.

Tip #1. Plan Everything Thoroughly
To make a detailed product lifestyle photography plan, you need to define the sphere of application of your images. Besides, when you are engaged in lifestyle photography, get ready to spend much time and effort to arrange the product in the best way possible.

Who are the potential clients that will use the product? Where and how will it be used? Are there any related items? What are the best shooting conditions (artificial or natural light) to photograph this product?

Tip #2. Examine Your Competitors’ Work
Before you start working, it’s a great idea to visit some professional marketing websites, where you can find intriguing life photography ideas that will work beneficially for your product. Don’t underestimate the spots of the original companies, which are focused on the guests in your area and use their stylish-commerce life product photography ways.

Tip #3. Use Proper Gear
Lifestyle photography requires a lower outfit than standard product photography, especially, if you’re going to use natural light. Of course, you can create amazing iPhone product photography, but I recommend investing in a professional camera for product photography, like the Canon EOS revolutionary T7. You’ll also need a good lens for product photography, like Canon EF 50 mm f/1.8, and a dependable tripod brand, like GEEKOTO DSLR Tripod.

Tip #4. Don’t Include Other Logos or Brand Names
Don’t overdo with the props and include other brands’ ensigns in your prints. You may not only distract the attention from the main product but also get into some legal trouble.

Tip #5. Apply the Rule of Thirds
This is one of the most compelling photography composition ways, which you should master to compose the images professionally. The introductory principle behind the rule of thirds is to imagine breaking an image down into thirds( both horizontally and vertically) so that you have 9 corridors. The proposition is that if you place points of interest in the corners or along the lines, your print becomes more balanced and will enable a bystander of the image to interact with it more naturally.
FAQ
What are the crucial rudiments to consider when taking life product prints?
When creating life product prints, you should actively consider your target audience and the specific mood or emotion you want the prints to convey. Additionally, focus on crafting a visually captivating and relatable image that highlights the product in a real-life setting by paying attention to composition, props, lighting, and styling.
How can you effectively convey a life or story through product photography?
To effectively convey a life or story through product photography, it’s essential to focus on creating a narrative by incorporating mortal models or relatable scenes that showcase the product’s purpose and benefits. Paying attention to the overall mood, styling, and composition can help create a cohesive visual story that resonates with the target followership and enhances the product’s appeal.
How can you create a harmonious aesthetic and branding in life product prints?
initially, maintaining a cohesive color palette, lighting style, and overall visual tone across all images helps establish a recognizable and unified look. Secondly, paying attention to harmonious styling rudiments, similar to props, backgrounds, and composition ways, reinforces the brand’s identity and ensures a cohesive visual representation of the life associated with the product.

Conclusion: Lifestyle product photography captures images of products in real-life situations or settings, showcasing how the products fit into the daily lives of consumers. This style of photography creates a connection between the product and the potential customer by presenting it in a relatable context. It often incorporates props, models, or settings that evoke a specific lifestyle or mood, emphasizing the product’s features and benefits within that context. Marketing and advertising commonly use lifestyle product photography to tell a story and appeal to the emotions and aspirations of the target audience.

I hope this article on Aarav’s creation product photography tips will help you. For more such blogs on Aarav creation product photography or lifestyle product photography, please feel free to drop an Email:[email protected] If you have any questions or feedback, please do contact us:7888799584